Breast Reduction (Mammoplasty)
Conveniently located to serve the areas of Dallas, TX

Breast reduction surgery allows our Dallas plastic surgeon, Dr. Steven J. White, to deliver more natural and beautiful breasts to patients suffering from excessively large breasts. Over the years, our practice has been able to consult and deliver excellent results to countless individuals desiring smaller, shapelier breasts, as well as provide relief to those who experience the discomfort that large, heavy breasts can cause. Breast reduction surgery works by intelligently removing undue breast tissue and skin, ultimately leading women to enhance their shape and aesthetic size while spending less time frustrated with painful symptoms and the inability to wear certain clothes or perform specific exercises.
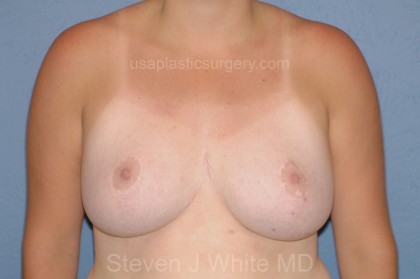
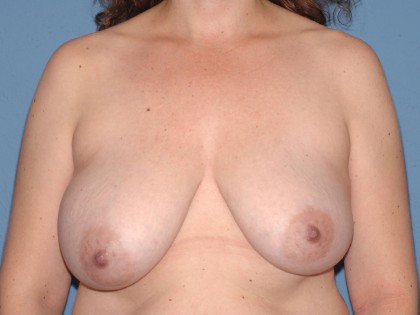
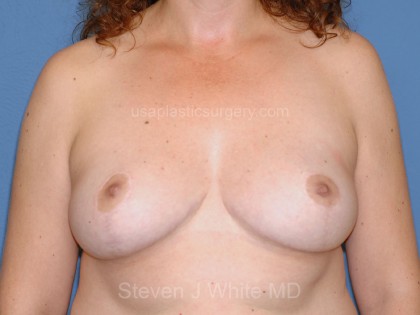
Before and After Photos
Contents
- 1 Before and After Photos
- 2 Elegant Precision™ Breast Reduction / Mammoplasty
- 3 Breast Reduction/Reduction Mammaplasty: Introduction
- 4 Breast Reduction: Who Are the Best Candidates for Breast Reduction Surgery?
- 5 Breast Reduction vs Breast Lift: What’s the Difference?
- 6 Breast Reduction Types: Pedicle vs Free Nipple Graft Procedure
- 7 Breast Reduction: Diagrams/Procedure Details – How is Breast Reduction Done?
- 8 Breast Ptosis (Drooping) – How to Determine Breast Drooping – Ptosis Grades
- 9 Inframammary Fold (IMF) to Nipple Distance – Which Breast Reduction Procedure is Best? How this Determines Best Breast Reduction Technique
- 10 Postop Venous Congestion After Breast Reduction Surgery
- 11 Breast Reduction/Reduction Mammaplasty: Overview – Procedure Details
- 12 Breast Reduction Post-op: Drains – How Drains Enhance Breast Reduction Recovery
- 13 Breast Reduction Post-op: Pain – Precision Surgery = Less Pain
- 14 Breast Reduction Post-op: Bra – Why Wearing a Bra is Essential after Breast Reduction Surgery
- 15 Breast Reduction Post-op: Scar – How to Minimize Breast Reduction Scars
- 16 Preventing Problems: Precision Surgery – Why Elegant Precision™ Breast Reduction is Best
- 17 Avoiding “Dog Ears”
- 18 Avoiding “Bottoming Out”
- 19 Breast Reduction: Before/After Pictures – Patient 1
- 20 Breast Reduction: Before/After Pictures – Patient 2
- 21 Breast Reduction: Before/After Photos – Patient 3
- 22 Breast Reduction: Before/After Photos – Patient 4
Steven J White MD
USA Plastic Surgery – Dallas, Texas
Elegant Precision™ Breast Reduction / Mammoplasty
Read Transcript of Dr. White’s Video:
Breast Reduction/Reduction Mammaplasty: Introduction
Hi, I’m Dr. White. Thank you for coming today to learn about breast reduction. The goal for breast reduction is to take the breast apart, make it smaller systematically, and then put it back together again while lifting the breast, creating the prettiest shape, but also optimizing the blood supply to the nipple as well as the sensation. And at the end, to have the prettiest possible scars and hopefully, to have the breasts also match as close as possible.
Breast Reduction: Who Are the Best Candidates for Breast Reduction Surgery?
Now, who is the best candidate for a breast reduction? It’s a wonderful procedure. The patients tend to be very pleased with the outcome. They’re often bothered by large, heavy (the doctor term is “pendulous” breast), often with neck pain and back pain and shoulder grooving, sometimes with a rash underneath that can limit the activities of daily living. So a breast reduction is in fact a wonderful operation.
Now, the best candidates would be patients who are healthy, who have no significant underlying medical problems, and whose weight is stable. Now, there’s not an optimal weight at which to have a breast reduction. Obviously, it’s not meant to be a weight loss type procedure, but the goal is to have a reasonable BMI or a body mass index, that’s not too high, otherwise some weight loss in advance would be helpful, but a stable weight. In other words, you’re not gaining weight or losing weight, but the weight is stable and that’s a good thing for any body contouring … tummy tuck, liposuction, whatever the operation may be.
The other thing is of course, to not smoke or use any form of nicotine because nicotine squeezes the blood vessels, and that’s called a vasoconstrictor. So, any form of nicotine, smoking, nicotine patches, those types of things really can negatively impact the result and the healing and can lead to some significant and unsightly scars. So, what I tell patients is it’s okay to do a breast reduction for a patient who was a smoker … provided they absolutely promise to stop all forms of nicotine for one month before and at least two months after surgery. So healthy patient, non-smoker, stable weight. And so that’s the idea for the best candidate for breast reduction.
We often have the patients check preoperatively to ensure that the labs are all in order and the EKG. Frequently, we’ll have a mammogram preoperatively to ensure that we don’t have any underlying breast concerns … and if so, we may have you checked by the breast surgeon.
Breast Reduction vs Breast Lift: What’s the Difference?
Breast Reduction Video – USA Plastic Surgery – Dallas – Fort Worth, Texas TX – Dr. Steven J White MD
But the breast reduction is a wonderful operation. It’s often very similar to a breast lift. Both a lift and a reduction include taking the breast apart, lifting it on the chest wall, and reshaping it.
The difference between a lift and a reduction is … what is the primary goal of the operation? A breast lift is designed to take a breast which has settled down with time, to lift it, to reposition it, to reshape the breast and to match as close as possible. A breast reduction, on the other hand, is designed to take a very large breast and to make it proportionately smaller … but at the same time, lift it on the chest wall, reposition it, and reshape it.
The difference is in the way in which the operation is performed. In a breast lift, we typically want to maximize the tissues that we currently have and keep, essentially, the same volume, although all lifts involve some degree of reduction because when you lift the breast up and reshape it, oftentimes there’s a little fullness on the side so that some of the side tissue needs to be removed. On a breast reduction, again, it’s the opposite. The goal is to minimize the size but to also perform a lift. So, there’s a difference in the operation and the way that the operation is performed. In a breast reduction, I start with whichever breast is the largest breast, lift it up, make it as pretty as possible, and then take the smaller breast in order to get it to match.
Breast Reduction Types: Pedicle vs Free Nipple Graft Procedure
Essentially, there are two main types. One is what the doctor term is a “pedicle” breast reduction, and the other is what we call a “free nipple graft.” And essentially what it boils down to is the blood supply to the nipple … and that’s what determines what’s the best way to go. Obviously, the best result is to optimize and maximize the blood supply to the nipple and to the breast itself. And when we talk about a “pedicle” breast reduction, the nipple is attached to the body in some way. And that’s what we call the “pedicle,” the way in which it’s attached. Most commonly, I like to use, and most doctors prefer to use, an inferior pedicle. In other words, it’s attached from below (or inferiorly), and this is where it’s attached to the chest wall and the nipple is here.
And so what I like to do is I take the breast apart, make a pocket or a space on top of the muscle, very similar to a breast implant. For a breast implant, I make a space underneath the muscle and then place an implant in order to make the breast larger and to reshape the breast. In this case, the way that I prefer to do a breast reduction is to take the breast apart, make it proportionately and systematically smaller, and then make a pocket on top of the muscle (instead of under the muscle with breast implant), up underneath the breast and take your breast, take the surface skin off, lift it up, reposition it, and bring the skin over the top. And that’s what allows me to reshape and to create the prettiest pair of breasts for you.
Now, the pedicle determines the size of the breast when we’re done. In other words, it depends upon how much distance there is from the body to the nipple. For example, let’s say the tip of the tie is the nipple. If it’s attached here, it doesn’t have too far to go. If it’s attached down here, then it has much further to go. And the further the distance, the greater the potential for loss of sensation and loss of blood supply to the nipple.
So, if a patient has a very large breast, which is hanging very low and the distance from the fold to the nipple is very long, by the time the blood supply gets to the nipple, the nipple wouldn’t be able to survive. And so in that case, the best way to approach that is what we call a “free nipple graft.” And in that case, the nipple and the colored area around it, which is called the areola, is actually removed kind of like a skin graft, if you will, and then the breast is reshaped in any form that we want. And then we take the nipple and the areola and put it back on and sew it in place. Now, that’s a “free nipple graft.” And we typically don’t do that, very rarely, and only if we really need to … because the tradeoff is the blood supply is obviously absent at that point, and the body has to grow new blood vessels into the nipple-areolar complex. Also, the sensation is lost. So, we would prefer to leave the nipple attached as a pedicle.
Now, the pedicle (or the attachment to the nipple) most commonly is from below as an inferior pedicle. It could be from above or from the inside or from the outside, but most commonly from below. So, in a breast reduction, if we’re going to leave the nipple attached to the body, when I make the breast smaller, it’s the blood supply to the nipple … and the amount of tissue that’s required in order to preserve the blood supply to nipple … that determines the final size of the breast. So most patients prefer to have the breast taken apart and made as small as possible, and yet still retain a pretty shaped breast. Sometimes the final result is determined based upon how much blood supply is required to preserve the blood supply to the nipple.
Breast Reduction: Diagrams/Procedure Details – How is Breast Reduction Done?
Breast Reduction Video – USA Plastic Surgery – Dallas – Fort Worth, Texas TX – Dr. Steven J White MD
I’d like to now help you better understand the breast reduction procedure by showing you a few diagrams. The incision that’s most frequently used is a Wise pattern breast reduction, although I’ve modified it to some degree when I make the initial incision on a breast lift compared to a breast reduction. The difference is, on a breast lift, we often know where the nipple is going to end up at the end of the operation. But a breast reduction, since we’re making such a big change in the size of the breast, I don’t know until the end. And so at the very end, I make a circle where I want the nipple to come out and it’s underneath the tissues, and then I make a circle and bring the nipple out.
The classic Wise pattern breast reduction involves scars and incisions that are a keyhole, such as this, typically with the larger areola that is made smaller. And this is then moved up into here. The skin then comes around. So the idea is the nipple is supported by the tissue below. I keep all of this tissue and remove the tissue here, remove the tissue on the inside, on the outside, as well as along the pedicle. And then from underneath the flap, centrally, I remove breast tissue. So I take the breast apart, make it proportionately and systematically smaller, and then take the surface off of the skin on the pedicle, leave the nipple attached, lift up the tissue, push this up and bring the skin over the top. And at the end, once I’ve reshaped the breast, with the patient in a sitting position, I mark where I want the nipples to be exactly in the same place, and then I make that perfect circle and then remove some of the skin to bring the nipple out and then sew it in place. So that’s how the breast reduction is somewhat different than the breast lift.
Often with the breast lift, we already know where it’s going to be. So when I do my markings for the breast lift, they are slightly different. The breast reduction marking at the time of surgery with a large areola here. If we want to put the nipple here, often I use a V shape. The areola is made smaller, and I leave this attached from below. This is my pedicle. This is my blood vessels growing in from below. I keep this. I remove the tissue on the outside. I remove the excess tissue on the inside. I remove the excess tissue around the pedicle. I remove the excess tissue up in here, up underneath the skin. I lift up the skin and then I thin the skin. I take the tissue from below with the nipple attached, lift it up, and then bring the skin over the top. And that’s how I reshape the breast.
Now, I like to start with the largest breast, make it proportionately and systematically smaller, and then get the prettiest breast for that side. And then I take the other breast, which is a smaller one, lift it up and get it to match. The reason I start with the larger one is because often the distance to the nipple is a further distance and therefore it requires a greater blood supply and maybe a bigger pedicle. So, it’s the amount of tissue that’s required to support the nipple that determines the ultimate size of the breast. The nipple is attached to the blood supply, typically, from below in an inferior pedicle. It could be attached from above in a superior pedicle or from the inside from a medial pedicle. Rarely from the side laterally. So, it’s the amount of tissue that’s required to have the best blood supply to the nipple that determines how small the breast can be. And that’s the rate-limiting step.
Once we convert to a free nipple graft, we can make the breast whatever size we want and then just put the nipple on. But again, the trade-off there is you typically lose sensation as well as the ability to breastfeed. Now, most women probably can’t breastfeed after breast reduction, but it’s possible they might. However, most people do have sensation after a breast reduction, which is kind of a surprise to most people because they think that a breast reduction means you’re going to lose all sensation. In most cases, no, they don’t. Now some patients don’t have much sensation before surgery because the breast, often as they get larger, sometimes they lose some sensitivity. But as a general rule, patients typically do preserve sensation after breast reduction, although it varies based upon each individual. So, the blood supply to the nipple, again, is what determines the final size.
Now, once I take the breast, essentially, apart, I make it proportionately smaller. The way that I do that is actually, I think, important. Starting with a larger breast, and one side’s always a little different than the other. So the nice thing about a breast reduction is not only is the size decreased … it’s also an opportunity to create a breast lift … but also match the size and shape of the breasts … because one’s always a little different in size and shape than the other. So, when I take the breast apart, what I do is I systematically address each area. I start with the inner (or medial), and then go to the outer or (lateral), and then go to the pedicle and then go to the central. And sometimes you don’t know exactly, while you’re doing the operation, how much to take from each area. You can always take a little more, but it’s kind of hard to put it back. So, the way I prefer to do it is … I have four different containers and I’ll start, and I take some from the inside, I take some from the outside, take some from the pedicle, takes some from the central. And as I remove it, I give it to the nurse and they put it in each of those different containers. And we add to each container as the operation goes on.
At the end of the operation, we have … four different containers for the … four different areas. And then we get a total weight (per area) and then we add them all up for a total weight (per breast). Now, why is that important? Well, if we start with a biggest breast and I remove so much from the outer side, then on the smaller breast, I would most likely take less out on that side compared to this side. So it helps guide the operation … in order to ensure that we remove a proportionate amount from each side. And at the very end, we take a total weight per side and then we send it to the pathologist to ensure that they can look at it and make sure there’s no underlying breast pathology. So that’s one of the ways that I do it that’s different. Most people will tend to just make one breast smaller, put it all in one container and ship it off to pathology at the end, but really not have that counterbalance, if you will, to know on each area how much is removed.
And as I lift the breast up and then reshape it, I look at the shape and say, “You know what? I need to enhance the shape in this area. I need to open it, take a little out here and then reshape it again.” And so then we’ll take a little bit more out and add it to that area (in the container). So, it’s a systematic approach. And when we’re done, once one breast has been reshaped, now what we have is this is the mark here. The nipple is down underneath, this gets brought together. There’s a line from here down, and this skin that’s here used to be over here, and it got pulled all the way down. This skin that’s here used to be up here, and it got pulled all the way down. So you pull the skin over the top of the breast that’s underneath and the nipple is hidden underneath.
And at the end of the operation, you sit the patient up. And once you’ve got one breast pretty … the other breast pretty… then you reshape each in order to get them to … match as close as possible. Then you put your markings, the perfect circles for the nipples, and then remove that skin and bring the nipple out and sew it in place. So at the end, what we do is we determine where’s the best place to put the nipple-areola, and then we make an opening and bring it out. And I’ll show you some intraoperative pictures next. And I think it’ll help you better understand this whole process. After that, what I’d like to do is also show you what the result looks like with the steri-strips in place.
So, after we’re done, I sew everything up in multiple layers because we’re … trading a size … for a shape and a scar. And we want to have the prettiest size … the prettiest shape … and the least noticeable scars. And the scar depends upon … the blood supply … as well as the tension … as well as how we take care of it after surgery. So I want to maximize the blood supply to my tissues and minimize my tension during surgery. So if I’m going to sew up a scar, I would like to sew it up in layers. Because if this is the incision, and if I put one layer in versus putting in several layers, this is stronger. This is twice as strong as that and that takes the tension off of the skin. Because if the skin is being pulled together, it’s the sutures that hold it together. And if it’s weak, it’s going to tend to widen and the scar’s going to tend to widen. So I’d rather … spend more time doing a better operation in order … to get the best possible scar. So we want to … optimize the blood supply … and minimize tension, … and sew it up in layers. And later we’ll use the steri-strips at first, and then silicone sheeting, and then silicone scar gel. And that helps tremendously as we fade that redness over time.
Breast Ptosis (Drooping) – How to Determine Breast Drooping – Ptosis Grades
Breast Reduction Video – USA Plastic Surgery – Dallas – Fort Worth, Texas TX – Dr. Steven J White MD
Now, I’d like to explain the doctor term “ptosis” which means drooping. And if we look at the breast, this is a chest wall and this is the breast, in youth, the nipple is typically about here. With time, typically the breast begins to settle some and the nipple may be here. And sometimes as the breast gets larger with weight gain or sometimes weight loss or pregnancy, we begin to get some degree of drooping, and also with age, whereby the nipple could be down even further. And when we talk about ptosis or drooping as a doctor terminology, we prefer to talk about how the nipple relates to the fold underneath the breast. We call that the “inframammary” (or below the mammary gland) fold. This is the in inframammary fold and this is the nipple here. So, there’s no ptosis or no drooping. This is the inframammary fold here and the nipple is just above. If the nipple is at the fold, that would be Grade 1 ptosis. If the nipple is below the fold, that would be Grade 2 ptosis unless the nipple is pointing down towards the floor, in which case if it points all the way down, that’s considered Grade 3 ptosis. And so it’s just a relative guideline to talk about how much drooping there may be involved.
Inframammary Fold (IMF) to Nipple Distance – Which Breast Reduction Procedure is Best? How this Determines Best Breast Reduction Technique
The significance of that is all breast reductions include a breast lift, which is good, but it depends upon how much the distance is. If this is the fold and this is the breast, with a large breast, and if the nipple is here, it’s the distance from the inframammary fold to the nipple … how long this is that determines the blood supply to the nipple. Because if it’s going to be pedicled (or attached to the chest), that’s where the blood supply comes from. So, the longer the distance … the further the blood supply has to go … so the wider it has to be to incorporate more blood vessels into that pedicle. And let me show you another example of that. If this is the chest wall in another view and this is the areola, and we’ve made that smaller, and the pedicle is perhaps about this wide and the blood vessels come from the chest wall and they come up into the nipple, and so there’s enough blood vessels. It’s wide enough to have enough blood vessels and they don’t have to go very far to get to the nipple.
On the other hand, if this is the chest wall and the nipple is up here, if we had a narrow pedicle, that would mean that I would have fewer blood vessels coming from the chest wall and they would have to go a much further distance, such that by the time those fewer blood vessels got all the way out to the nipple, the nipple doesn’t have very much blood supply feeding it and the nipple could die. And in that setting, that’s when we would tend to convert it to a free nipple graft. And again, in most cases, I would prefer to keep a little bigger pedicle, to have a little better blood supply in order to leave the nipple attached, to have a better blood supply, and also to maintain the sensation, hopefully, to the nipple. So when I talk about how it’s … the blood supply to the nipple … that determines the ultimate size, that’s what I’m talking about because it depends upon the pedicle or the amount of tissue attached to the nipple that’s required to maximize the blood supply.
Postop Venous Congestion After Breast Reduction Surgery
Breast Reduction Video – USA Plastic Surgery – Dallas – Fort Worth, Texas TX – Dr. Steven J White MD
I’d like to help you understand the concept of postoperative congestion. As I had talked about, when I do a breast reduction, I essentially take the breast apart, remove the surface skin except at the areola or the nipple-areola, and lift it up and take your breast and turn it into its own “implant,” if you will, and then bring the tissues over the top. When I bring that skin over the top and sew it up, it tends to get a bit congested. Now if you look at my hand … if you can see, the blood vessels are quite full. When I do this, the blood vessels tend to slowly go down, at least when I’m standing. And it’s an idea as to how they tend to drain. When the patient is lying backwards, the breasts tend to drain to the side. When they’re sitting up, they tend to drain down. But after surgery, the incision goes around the areola, goes down the middle and then up underneath the fold. And so that’s where the scar is, and that also compromises the blood supply. And so after surgery for this tissue to drain, essentially, if the patient is laying down, it drains around to the side, and this being the side where the arm is. This has to drain up and over like this.
So, the area that tends to get congested after surgery would be this area right in here because this tissue used to be here … and it’s pulled over the top of that pedicle. Now, why does that matter? Well, the reason it matters is because, from a healing perspective, you want to optimize the blood supply and then you want to have the best scar, and you want to minimize tension on the scar. You also want to decrease the venous congestion. In other words, blood gets in … but can’t get out … because that can lead to congestion which can lead to potentially a healing problem. And so in that setting, after surgery, if this is the areola, here’s the nipple, and here’s the vertical line, it’s this area here from the nipple down, this triangle, that tends to get congested. So after breast reduction, it’s helpful if the patient is laying back more in order to allow that tissue to drain … so it doesn’t get too congested early on.
And the concept of medical leeches is, in the past they would put leeches on to suck out the excess blood. Usually if there was a healing problem, it wasn’t so much that the blood couldn’t get in because the artery is under pressure. It’s more that it gets in … but it can’t get out … because the vein is under low pressure. So one of the things that I will often do at the end of the breast reduction … this is the area that would tend to perhaps get a little bruised at the end of the operation because that’s the tissue that’s pulled over the top and it’s under some tension. So, at the end of the procedure, sometimes I’ll do what I call “pin cushioning.” So before I wake you up, I’ll take a small needle and I’ll go dot, dot, dot, dot. And that creates little openings to allow that fluid to express itself and to ooze out over the first day or so. And that really helps minimize the congestion and it makes a big difference. We also will often use some nitroglycerin which dilates the blood vessels. So we want to maintain the fluids, open the blood vessels, and then often with the pin cushioning to help that excess fluid to drain out to minimize that chance for venous congestion.
Breast Reduction/Reduction Mammaplasty: Overview – Procedure Details
Breast Reduction Video – USA Plastic Surgery – Dallas – Fort Worth, Texas TX – Dr. Steven J White MD
Now, let’s talk about the operation. In the morning of surgery while you’re sitting up, I do some markings. I mark the sternal notch, the midline, and I mark the middle of the breast. We call it the “midline breast meridian.” That’s a doctor term. Underneath where the fold is and that’s where we mark for the nipple. Now, when we’re done, the nipple actually moves up from there, but that’s the point where we would mark it and it’ll actually come up a little bit. And then I mark the area that the tissue is going to be removed. Now, again, we put a little ‘cookie cutter” around the nipple and around the areola to take the large areola and make it smaller, and that draws a little circle around there. And this is the blood supply to the nipple that we keep.
Now, I remove medially from the inside, laterally from the outside, around the pedicle and then up underneath. I lift up this tissue to create a space (or a pocket) on top of the muscle, and I lift it all the way up into here, take this apart, remove the surface skin because this skin flakes off. When you’re a kid and you get in the bathtub, you get a ring around the bathtub. That epidermal skin tends to flake and so you can’t put this skin underneath. So it’s essentially kind of like a skinned knee, if you will. We take the very surface layer off and leave this attached to the nipple on an inferior pedicle, in other words, attached from below. Remove here, remove here, remove here, and then thin the flap underneath. Take your tissue, essentially turn it into its own ‘implant,” make the pocket, push it up and bring the skin over the top. And the skin comes together here. And then we have a little line just like that.
Now, again, these are the markings. This is the midline breast meridian, in other words, this mark right here from below. This is the inframammary fold. And this is a pedicle that I’ve marked here going up to the nipple. So, this we’re going to keep, take the surface skin off everywhere except right around the areola, and I take out a segment here, a segment here, remove some from here and then underneath. And this is the distance that I’m talking about. It needs to be wide enough to have enough blood supply to go to the nipple so that the nipple will survive. If that’s a long distance, the nipple may die and that’s when we would have to convert it to a free nipple graft, which is pretty uncommon but sometimes we need to.
Another example, again, from below, this is the pedicle leading to the nipple. This is where we mark it. And we remove here, remove here, and take the surface off here. So this is a moderate reduction, but not a dramatic reduction. But this is an intraoperative photo. Start with the largest one, lift it up, reshape it, preserve the blood supply to the nipple. The nipple is hidden underneath. And this is the one that hasn’t been addressed. So, start with a larger one. And this is the smaller one. And you can see what a dramatic difference. You see where we mark the nipple here and then you can see at the end, it ends up actually being considerably higher. Now, one of the things I do now is … actually sew it to the chest wall … at the end and that gives me more upper pole support. And that’s one of the last things that we do.
And here we are after surgery, and this is with the steri-strips in place. The incision goes around the areola down and then underneath. And I’ve drawn this little triangle from the nipple down to the fold that shows the area that we expect it to get congested. In other words, that’s where the blood gets in and sometimes it doesn’t move through quite as much because if you’re upright, it gets congested. That’s why after a reduction, I prefer that you drink a lot of fluids and then lay down more … so that it tends to drain out more frequently or more easily. And then this is an area that I often will do a little of the pin cushioning that we talked about in order to help allow the excess blood supply to ooze out so it doesn’t get too congested. And we’ll put some nitroglycerin there … and that helps dilate the blood vessels as well.
Now from below, this is the first breast that’s been reduced. In other words, it’s attached from here to here. The nipple is underneath, and you can see how I bring the tissues around to create the prettiest shape. And that’s a pretty significant change already. The nipple has been moved over, has been lifted up, and the breast has been reshaped. Now, both have now been done. And in this case, you can see that the position for the nipple has been marked on either side. And I do one, staple it … do the other, staple it … optimize the two to get them to match … figure out where the nipples are going to be, remove some skin, bring the nipple out, sew that in place, remove the staples, and then sew everything up in multiple layers in order to minimize the scar. And here we are at the end and you can see that is actually a considerable reduction in size, but yet still a pretty shaped breast. And I’ve drawn that triangle of area that we expect it to get somewhat bruised or congested.
And this is a close-up and you can again see the shape of the breast as the tissue gets brought around, and you see this area where you expect there to be some congestion and that’s before any pin cushioning was done. But this distance from here to here is purposely left a little bit short at the end of the operation with an understanding that the breast will settle to some degree and it fills a little bit along the bottom over time, such the nipple will come up a little bit more with time.
Breast Reduction Post-op: Drains – How Drains Enhance Breast Reduction Recovery
So let’s talk about the early postoperative recovery following the breast reduction surgery. So obviously, you’re in the operating room, we put you to sleep. And then after we’re done, we wake you up. I typically will use a drain, and the drains are one on either breast. They’re in for probably about a week and that collects any excess fluid. Rather than making the breast more congested, it allows that fluid to come out and it comes in a little plastic hand grenade, and you empty that a couple times a day. And when the levels are low, then we just slide the drains out and they slide out very easily.
Breast Reduction Post-op: Pain – Precision Surgery = Less Pain
Breast Reduction Video – USA Plastic Surgery – Dallas – Fort Worth, Texas TX – Dr. Steven J White MD
From a pain perspective, patients are typically off pain pills in about a day. It’s kind of surprising. We expect some congestion, some bruising, but sometimes not very much. Everybody’s a little bit different. And as I said, it’s helpful to drink a lot of fluids and that improves the perfusion through the tissues. And often we’ll use some of the nitroglycerin after surgery, possibly for a few days, to dilate the blood vessels and improve that blood flow.
Breast Reduction Post-op: Bra – Why Wearing a Bra is Essential after Breast Reduction Surgery
The bra at first is a little bit of a flimsy bra, and then later we often transition you into a more sturdy bra. After surgery, longer term, the concern is really about maintaining support. We’re essentially fighting gravity. In any type of breast lift or breast reduction, we’ve taken the breast, repositioned it higher on the chest wall, and we want to keep it there. So, at night it’s helpful to have a supportive bra that holds things in place. And during the day, it’s nice to have a supportive bra to keep things, again, in place because gravity tends to go down while you’re upright and tends to pull the breast to the side when you lay down at night, which is why it’s helpful to maintain that support.
Breast Reduction Post-op: Scar – How to Minimize Breast Reduction Scars
Breast Reduction Video – USA Plastic Surgery – Dallas – Fort Worth, Texas TX – Dr. Steven J White MD
At about six weeks after surgery, when the full strength is there at the scar, the body begins to add extra blood supply as the scar is healing. And very typically, what we’ll see at first is a fine line scar. And then beginning about six weeks, the body begins to add extra blood supply from below as well as from above and then underneath. And so frequently a scar will tend to look a little wider, maybe even three times as wide in that early phase. And then as that redness begins to fade, if you put tension on the scar, the redness tends to go away. You see the fine white line and that’s the final scar. And that takes up to two years for the maturation phase of the scar. Early on scars tend to be a little red, a little raised, and a little firm. And then as time goes on, they tend to become more flat, more soft, and more white. And so what we’ve found is that we can … maintain pressure early on … and take the tension off … then we can get much better scars. I really put a lot of energy and effort and attention to minimizing the scar. And as we talked about, I do a layered closure in order to take the tension off with the sutures. And then frequently, we use the steri-strips after surgery and then the silicone sheeting.
And the silicone sheeting, this is an example. It helps us after surgery in the early phase. It’s a sticky gel and it puts pressure to keep the scar from getting raised … and it takes the tension off to keep it from widening. And that’s helpful probably for about the first six weeks or so. And at that time, the full strength is there, but yet any scar is only about 80% as strong as it was before the actual injury or before the incision. So we like to maintain some sort of external pressure for about six weeks after surgery. And at that point, then the scar is at full strength and hopefully it shouldn’t widen at that point. And then at that point, we want to move to a liquid silicone gel which penetrates into the tissues. And this is some of the scar gel that we now use, and it’s waterproof. It just takes a little bit. You rub that in and it penetrates into the skin and it decreases the redness and the darkness by about 70%. The scars tend to fade over about a two-year process and this expedites that process, which is why the scar gel is so popular.
Now, as far as the scar goes, early on, we tend to see the scar around the areola, down the vertical limb, and then underneath. The breast settles a bit with time. And as the breast settles, what we find is the scar underneath is often hidden. The one around the areola or areola tends to fade with that color change. And so frequently, it’s just that little vertical line that is the visible scar. And that’s why I put so much attention into minimizing the scarring with the breast reduction. And so I’ll show you a few examples so you’ll have an idea as far as what the final result may be.
Preventing Problems: Precision Surgery – Why Elegant Precision™ Breast Reduction is Best
Breast Reduction Video – USA Plastic Surgery – Dallas – Fort Worth, Texas TX – Dr. Steven J White MD
Now, let’s talk about preventing problems after a breast reduction. I prefer precision surgery. Yes, it takes a bit longer … but I think it makes more sense to spend more time … doing a better operation … at the time of surgery and then … focusing on what could go wrong and … how you can avoid a problem. And I really believe that precision surgery is worth the effort. What we want to do is … minimize the trauma to the tissues and … maximize the blood supply. Typically, we have very little bleeding, which means we have less bruising, less chance of a fluid collection or bleeding after surgery. And the other thing that we want to consider is, again, getting the best scar and also the best size and shape and position.
So, if you don’t care whether both breasts are the same size, the same shape, whether the blood supply to the nipple is intact, whether the sensation hopefully is intact, then you can do the operation in pretty quick time. If any of that matters, however, it does take a while because you want to … optimize every step of the equation. And that’s the approach that I prefer because it’s what allows us to get the best possible results for each patient.
Avoiding “Dog Ears”
So, one thing that we want to consider after surgery is how can we avoid “dog ears.” Now, “dog ears” is a term that’s used to refer to kind of bent over like this or a little puffiness of the scars often here in the midline and also out to the side. And when I close the incisions, I close it and I kind of “zip it up” from each edge in order to minimize that, although it is possible over time, particularly if a patient were to lose some weight, that they may have a little puffiness there and that may need to be addressed later, but that’s very unlikely.
Avoiding “Bottoming Out”
Breast Reduction Video – USA Plastic Surgery – Dallas – Fort Worth, Texas TX – Dr. Steven J White MD
The other thing that we want to be careful of is how to avoid “bottoming out,” and “bottoming out” is a term that’s used to describe the breast that just kind of falls back down over time. One of the things that I like to do is … maintain internal support by … actually sewing the breast tissue to the chest wall … and that allows me to have more upper pole fullness. And I do it in a systematic fashion, typically with several sutures in the same position on either side, and that makes it less likely for the breast to settle with time. Also, we want to give adequate support after surgery, and we do that with a proper bra for a lifetime, and also in the early phase to minimize the potential for the breast to settle. If this is the pretty shape that we’re able to achieve, sometimes with gravity the breast will tend to settle down and we can even get a “squaring off,” if you will, of the breast, which we don’t want.
So, what I have discovered that works well in order to try to prevent that and maintain the results we have during surgery is we use a little wedge in this area right here, and that puts a little external pressure here. And then a little later, we add over the top of that, what we call a shaper, and that provides some extra support over this area. So, what we’re trying to do is we’re trying to provide a little push up in this area as the breast is healing so that if it does settle a bit, the settling occurs out here on the side, but yet we maintain that pretty shape. Because most of the tension is here. And when you pull, there’s more tension in the center … but not as much on the corner. So that’s why if you were to develop some puffiness, it would be more likely on the inside or the outside. And what I’ve discovered is that by putting a little extra pressure with a makeup sponge, this can be placed right here, essentially right there, and that provides a little gentle push up on the inside.
In addition to that, having the shaper over the top of it is very helpful to put this shaper over this area, and that’s over the top of the makeup sponge. And what that does is that provides some additional support, if you will. The makeup sponge is positioned like this. If this were to be the nipple, the makeup sponge goes in the inside, the shaper goes here and that lies down underneath. And that provides the push up here so that if it settles here… As the breast settles over time, the scar underneath tends to be under the fold, and you’ll see that as we look at some of the results in a moment. Now, we have a diagram that roughly illustrates how to best orient the makeup sponges and the shapers to maintain that pretty shape by providing a gentle pushup on the inside, and then the silicone shapers over the top. And that helps to maintain that internal pushup to minimize the potential for the breast to square off over time. We put a lot of effort into getting the prettiest shape during surgery, and we want to take the precautions after surgery to maintain that pretty result. And I have found that this really does make a nice difference in order to maintain the pretty shape that we’ve achieved.
Breast Reduction: Before/After Pictures – Patient 1
Breast Reduction Video – USA Plastic Surgery – Dallas – Fort Worth, Texas TX – Dr. Steven J White MD
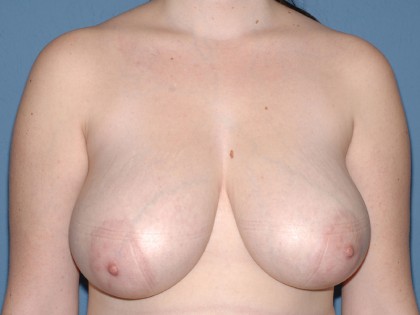
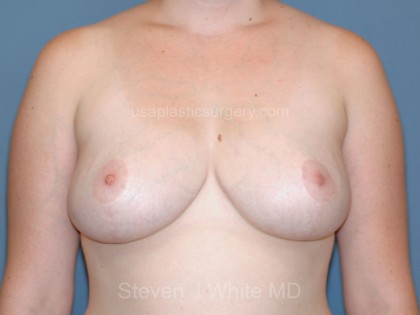
Now, I’d like to share with you some of the before and after photos of some of the patients who’ve been gracious enough to allow us to share their results. As we can see, a patient for breast reduction, always one side is a bit different than the other. And in this case, her right breast is a little bit larger than her left breast. The nipple is a little lower on the right than it is on the left. And we can see from before to the after. Now after, you see how well the nipples line up. Compared to below, one is different than the other. I think this is a very pretty shape. The scar goes around the areola, down, and then under the fold. Around, down, and then under the fold. What’s nice is if we happen to see a beauty mark or something of that nature, an identifiable mark, we can see how much the nipple has moved and how much the breast has moved. And in this case, she has a mark right here. And if we bring this across and bring this across, you can see how much the nipple-areolar complex actually moved.
Now from the side, the distance that we were talking about is from the fold to the nipple, and this is with an inferior pedicle. And you can see a very nice shape here and on either side. And then in the lateral view, one can see how much of the breast tissue is below the fold before versus the fold after. And the whole breast tissue has been not only lifted … but also significantly reduced, and then with the nipple well above the fold.
Breast Reduction: Before/After Pictures – Patient 2
Breast Reduction Video – USA Plastic Surgery – Dallas – Fort Worth, Texas TX – Dr. Steven J White MD
The next patient also has an identifiable mark, which we can see here. And you can see how much the nipple has been brought up all the way up to here. Again, the nipples are lined up well. The scar around the areola tends to fade quite nicely. The vertical line tends to fade nicely. And this is a little longer term follow up where the breast has settled a bit more and the scar underneath becomes less visible. And again, one side is always a bit different than the other. You can see the nipple on this side is a little bit more lateral (or more off to the side.) It’s over off to the side of the chest wall compared to here. And this one sits a little bit lower. You can see how the areola is much larger. And then after surgery, how that’s been decreased in size.
Again, this gives a very nice view on the oblique view to gain an appreciation for the inframammary fold here … and the fold is now here. So, the whole breast, after it’s been reduced, is well above the fold in the after … compared to the before. Again, the scar around the areola fades very well with the color change. The vertical line tends to fade very nicely, and then the one that runs underneath. And again, from the side, one can gain an appreciation for how much breast tissue is below the fold before surgery … versus how much that’s been lifted up. And I think that’s a very, very nice, pretty shape. And you can see how large the areola is here … versus how much that has been reduced.
Breast Reduction: Before/After Photos – Patient 3
Breast Reduction Video – USA Plastic Surgery – Dallas – Fort Worth, Texas TX – Dr. Steven J White MD
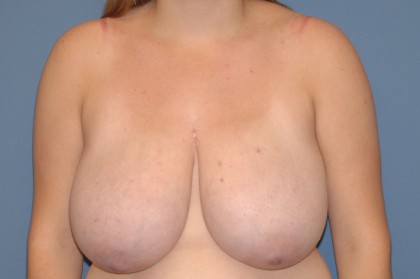
The next patient, again, shows a difference from side to side with the nipple being a little lower and more lateral here compared to here. She also has some identifiable marks, one being a small mark here, which you can see in the after view, and you can gain an appreciation for how much that nipple got moved up. The nipples seem to be in the same place. I think a pretty shape. The scar around the areola tends to fade well, the vertical line, and then underneath.
Some patients find that they tend to look thinner, obviously after breast reduction, because … not only has the breast volume gone down … but the breast have been lifted up … and the shape has been improved … and it shows off more of the tummy. So this distance, this length here, has been diminished significantly after the breast has been lifted up on the chest wall. After surgery, you can gain an appreciation for how much this particular patient’s breasts have been reduced. And then again, with a significant degree of ptosis where the vast majority of breast is down below, and that’s been lifted up in the after view.
Breast Reduction: Before/After Photos – Patient 4
Breast Reduction Video – USA Plastic Surgery – Dallas – Fort Worth, Texas TX – Dr. Steven J White MD
This is a patient who has a very light complexion. And if the complexion is very light, what we tend to find is the redness tends to be somewhat more apparent for a little longer. Again, it’s a two-year process before that redness fades away. And you can see here, she has a little “shoulder grooving” where the weight of her breast and the bra is kind of creating a groove in her shoulders. And then after surgery, you can see how well the nipples line up, how pretty the shape is, the scar around, down, and underneath. The underneath tends to be, essentially, not noticeable because it sits underneath. This goes with the color change, and then the redness along the vertical limb tends to fade with time. And she’s an ideal candidate for continuing to use the gel, which again, decreases the redness by about 70%. And this is one that I had done before we started using the gel. And so I think that the gel really does make a significant change. And again, if we look at where the fold is here, how much of the breast tissue got lifted up after it was reduced. And I think that creates a really pretty change.
So, I thought that would be helpful to gain an appreciation for some of the results that can be achieved. All of those were inferior pedicle, so the nipple is still attached. And in each of those cases, their sensation was preserved.
So, everybody’s a bit different, but we want to … take more time to … do a better operation and then … teach you what we can to help you get the best possible result after surgery using the makeup sponges, using the shapers, the appropriate bra, the appropriate support, the silicone sheeting, the liquid silicone gel in order to … minimize the scar and to … maximize your final results. So, I hope that was helpful. And I look forward to visiting with you further to get an understanding of what your special concerns are and in what way I may be able to help you. Thank you.
Elegant Precision™ Breast Reduction
Breast Reduction Video – USA Plastic Surgery – Dallas – Fort Worth, Texas TX – Dr. Steven J White MD
Key Points – Elegant Precision™ Breast Reduction
Goals
- Reduce breast size
- Reduce areola size
- Lift breast higher
- Optimize shape
- Preserve sensation
- Minimize scars
Key Points – Elegant Precision™ Breast Reduction
Surgical Technique
- Infra-mammary fold to nipple distance
- Determines surgical technique
- Inferior pedicle vs Free nipple graft
- Inferior pedicle – blood supply to nipple determines size
- Free nipple graft – allows smaller size, yet lose sensation
Key Points – Elegant Precision™ Breast Reduction
Procedure
- REDUCE – begin with larger breast
- REDUCE – systematically in 4 areas
- REPOSITION – lift breast, suture to chest wall
- RE-SHAPE – match size, suture in layers
Key Points – Elegant Precision™ Breast Reduction
Scar Optimization
- Maximize blood supply – precision surgery
- Minimize skin tension – layered closure
- Suture in layers with magnifying loupes
- Steri-strips x 3 weeks
- Silicone sheeting x 3 weeks
- Silicone gel x 2 years
Key Points – Elegant Precision™ Breast Reduction
Intra-Op
- Steri-strips
- Pin-cushioning, nitroglycerin
Post-op
- Early – maintain fluids, lie on back
- Late – sponges, shapers, snug bra for life


